Manage specifications
Semantic specifications exist in different forms, some are expressed as a PDF document with tables, figures and descriptions, some are more formalized, such as an ontology. Semantic Treehouse aims to support different specification types, allowing users to view and allowing maintainers to manage them. The most widely used type and the type that offers most functionality is the Message model. The editing functionality for message models is called the Wizard. The Wizard has a separate documentation section. The following section offers the guidance on how to add and edit the general aspects of all other specifications and their versions.
Supported specification types in Semantic Treehouse
- Message model (described in Wizard section)
- JSON schema
- Ontology
- Taxonomy
- Technical standard
- External specification
These specification types have in common that they are grouped and presented in what we call Projects and that they can have versions of them. When maintainers create a specification, a version is not automatically created. The reasoning behind this is that a specification should be able to exist, be described and discussed also before any version of it exists.
An additional specification type exists and it is called a codelist. This is, due to historic reasons, not a versioned asset. It typically contains a flat list of code values with descriptions, eg. country codes.
- Codelist
Create a specification and a specification version
The section below is applicable to specifications of all types. The example shows the ontology specification type, but it also applies to other specification types. Note that because of the extra functionality of the Wizard the Message model type looks slightly different.
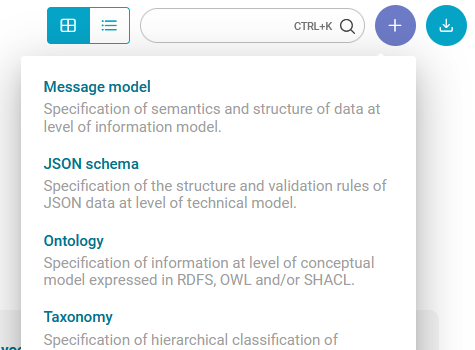
The '+' icon for adding specifications is located at the top right corner of the Specifications screen. Clicking it reveals all types of specifications, among which is the Ontology.

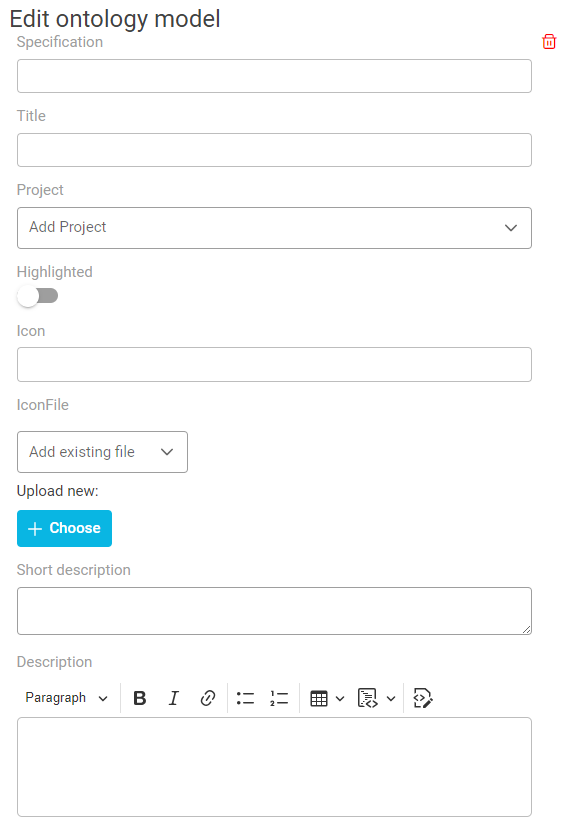
After clicking Ontology, the edit screen appears, asking you to fill a few required and optional field.

The first form fields are the same for all specification types. The fields include:
- The Specification field asks you to enter an identifier of the specification. This identifier is used among other uses as a part of the URI of the resource in a technical export of the Semantic Treehouse environment, so it's best if it is URL-friendly (no spaces, eg.).
- The Title field on the other hand, is used as a human-readable label in the user interface, and this is the name that appears on the specifications overview screen for the users of the platform.
- The Project field should list the project this specification is in. Note that a specification cannot 'live' outside of a project, so you could add it to the default project or create a new project using the List all projects screen that appears on clicking the triple dots next to Specifications on the overview page.
- The Highlighted toggle gives visual emphasis and priority to viewers of the specification in the overview screen of all specifications of a project.
- Users can upload their own Icon to be shown in the project overview by using the IconFile dropdown, if the file is uploaded to the STH environment already, or the Upload new button. As an alternative, the Icon text field can hold the local path to the icon file (if it is pre-defined in the STH environment for example).
- Short description is used in the Projects Overview page. It typically fits 80/90 characters before abbreviating the rest.
- The full description can go into the Description box. When no short description is defined, the long description is taken and cropped to fit in the overview text field.
- Versions shows a table with all versions of the specification. See the section below for a detailed description.
- The More section allows users to add related documents that are of interest to users and that apply to all versions of the specification. Users will be able to see the file name and download the files that are uploaded here. For example, it could be used to upload a PDF document that describes the scope of the standard.
- Finally, Acknowledgements offers a place to mention the organization who created the specification. Only existing Organizations can be selected, so please use the Organizations menu item if a new organization should be created. Below Authors and Contributors the people are summed up that are stated as authors and contributors for the different versions.
Creating a specification version
Versions is an important UI element. It shows a table that is initially empty for a new specification. The '+' icon on the right of the header row allows users to add a version and define the basic information of that version. An additional edit version screen is available after that (by clicking the triple dots) to fill in more details after a row has been added.
It is recommended to fill in a Version id. This identifier will be used as a label to show to users, but also in several technical exports of the specification. Status can be used to indicate additional description of the status of this version, eg. 'draft'.
The Locked toggle can indicate whether a message model can be edited or not. While working on a new Message model, for instance, there will be changes from time to time. Turning Locked on will disable some of the editing features of Semantic Treehouse as an additional tool to ensure stability of the specification. Typically, only the latest version of a specification is unlocked and the older versions will be locked.
New versions are not published and thus not visible by default. Maintainers can toggle Published on to make specification versions visible to people with the User role. If it is not set, only maintainers will be able to see and edit the version. The Highlighted toggle can be used to make that version of the specification the most prominent of all versions.
Finally, the trash can icon on the far right will allow users to delete a version and its contents. When clicking it, the maintainer will first be asked for a confirmation before executing the delete action. There is no trash can or undo option, so be very careful with removing versions.
